I originally published this article in 2012 for use with Vibe 3.x running on SLES 11. The general architecture of Vibe today is the same even through the current release, version 4.0.8 running on SLES 15 SP3. As such, this document should still be relevant. Path names and commands may be slightly different on Windows and/or other Linux versions, however the overall process should be the same.
When I originally wrote this document, the purpose was to demonstrate how to implement a 3rd party certificate for the first time in Vibe. Where the document fails is when it comes to renewing the certificate or even implementing a 3rd party Wildcard certificate. I'll touch on these different points where possible.
I created this guide to provide a straight forward set of instructions for using a 3rd party SSL cert with Micro Focus Vibe. It was originally written to use Godaddy certificates, but the process is essentially the same for any certificate provider. I've adapted this from a related Novell TID and technical field experience. Reference Docs:
- Novell's Document: TID 7001857 Adding SSL Certs in Vibe
This document is broken into two sections:
- How to insert an existing certificate (or Wildcard Certificate) into the Tomcat keystore for Vibe.
- How to start from scratch, including the creation of a CSR and Keyfile for use with Vibe if you have not done it before.
Implementing a Wildcard Certificate
The process for implementing a Wildcard Certificate is different because you most likely already have the certificate in your possession, and you most likely also have an existing key file. Because of this you do not need to go through the CSR and Keyfile creation process.
Assumptions
I'm assuming you have an existing keystore file that is functional, and you are replacing an expired certificate.
Prepare Existing KeyStore File
It's first necessary to remove the old certificate from the keystore. First identify what to remove, then remove it. The first command will list the contents of the keystore. If you review the contents closely, you'll notice that each component has it's own section. There's a section for the root CA certificate, the Intermediate Cert, and your own cert. At the top of the section, there is an "Alias name". You need to find the section that contains your expired certificate and then note the name of the alias. It's possible it is "tomcat" if you've followed this guide previously. These two commands will allow you to view the contents, then delete the section for the "tomcat" alias, which should contain your existing expired certificate.
- keytool -list -keystore .keystore
- keytool -delete -alias tomcat -keystore .keystore
** Once you have deleted the tomcat alias, you can list the contents again and confirm the expired certificate is gone.
** You may also want to delete the existing root CA and any intermediate certs, especially if you are changing vendors or if those certificates have changed. Since you generally get a new set of files when you obtain a certificate, it may make sense to just replace all of them.
Add Root and Intermediate Certs to Keystore
- /opt/novell/teaming/jre/bin/keytool -import -trustcacerts -alias root -file My_CA_Bundle.ca-bundle -noprompt -keystore .keystore
- /opt/novell/teaming/jre/bin/keytool -import -trustcacerts -alias intermediate -file USERTrustRSAAAACA.crt -noprompt -keystore .keystore
Prepare your Wildcard Certificate
You should have a Certificate file from your 3rd party vendor, and a private key file that you created with the CSR. You will need to combine these into a single PKCS12 formatted certificate file.
- openssl pkcs12 -export -out vibe.pfx -inkey wildcard.redjuju.com.key -in STAR_redjuju_com.crt -name tomcat
(You'll be prompted to enter an export password, set this to whatever you like, however don't lose the password. You'll need it to import into the keystore).
Add PFX formatted Wildcard Certificate Keypair to Keystore
Now use the keytool to import the PFX Certificate
- /opt/novell/teaming/jre/bin/keytool -importkeystore -srckeystore vibe.pfx -srcstoretype PKCS12 -alias tomcat -keystore .keystore
Starting from Scratch
General Recommendations
- Use a temporary directory for most of this process. It keeps things simple.
- Go Daddy requires a 2048 or 4096 bit keyfile. On my first run through, my CSR failed to meet this requirement, so I had to redo it and add the "keysize" parameter that you'll see below.
- If the "keytool" command is not found on your system, look for it with the "find / -name keytool" command. Then specify the full path name from the command line. On my SLES 11 SP1 server, it was under /usr/java/jdk1.6.0_20/bin/. I use the full path name throughout.
- Novell recommends using "changeit" for the password. I don't recommend this. A best practice recommendation would be to use a randomly generated password. (Side note is that if you do change the password, be aware that Vibe upgrades will likely revert the configuration files to use "changeit" and this could cause a Vibe failure.)
- Whatever password you choose, use that same password anywhere you are asked for one during this process.
- While this was written specifically for Go Daddy certificates, the process for other 3rd party providers will be very similar.
- You do not need to import the SSL cert into eDirectory. You do not need to use iManager or ConsoleOne for any of this process.
Step 1 - Create the Keystore File
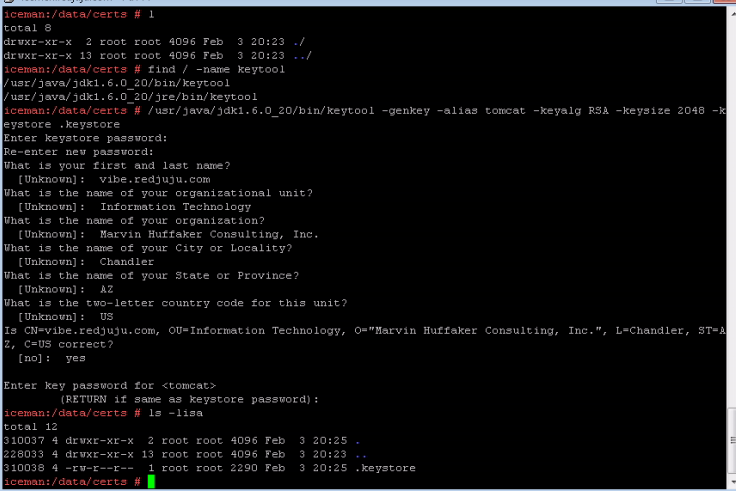
1. Get to a Linux command line and change to a temp directory. Example: /data/certs.
2. Use the 'keytool' application to create a new file called ".keystore".
/usr/java/jdk1.6.0_20/bin/keytool -genkey -alias tomcat -keyalg RSA -keysize 2048 -keystore .keystore
3. When prompted for a password, enter the password of your choosing.
4. When prompted for "First and Last Name", enter the full DNS name of the Vibe server. (NOTE: this is a critical step, and it must be the name that users will type into their browsers when accessing Vibe. Otherwise, their browser may reject their connection to the site) Example:
vibe.redjuju.com
5. Enter all other organizational details. Department, Company, City, State, and Country. For State and Country, you generally use a two character abbreviation, while the others are spelled out. For example:
Information Technology
Marvin Huffaker Consulting, Inc.
Chandler
AZ
US
6. A summary prompt asks if the information is correct. Enter "yes"
7. Press ENTER when prompted for a password. It will use the one you entered previously. You do not need to reenter it.
8. Once you are back at your prompt, you should see a file called ".keystore". Look for it using the following:
ls -lisa
The screenshot below depicts the full sequence for this section (Click to see larger image):
Step 2 - Generate the Certificate Signing Request (CSR)
The CSR is the file that is sent to Go Daddy (or pasted into their web form). This is completed at the command line of your Vibe server.
1. Enter the command below to create the CSR file:
/usr/java/jdk1.6.0_20/bin/keytool -certreq -keyalg RSA -alias tomcat -file .csr -keystore .keystore
2. When prompted, Enter the keystore password that you used previously.
3. At the command prompt, you should see a file with the extension ".csr", and it is named whatever you called it in the above command.
4. You'll need to copy this file to your local workstation so you can upload the contents to Go Daddy in the next step.
The screenshot below depicts the full sequence of this action:

Step 3 - Generate Certificate
This step is completed online in your Go Daddy Control Panel at www.godaddy.com. Note that I used a single standard certificate, not one of their bundles. The process is essentially as follows:
1. Launch the SSL control panel, which provides an intuitive step by step process.
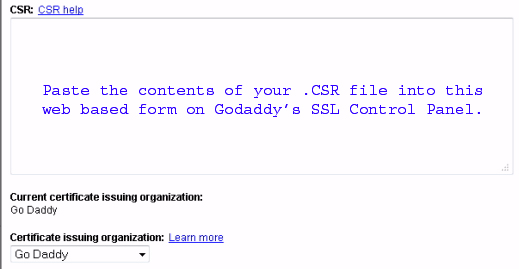
2. Copy the contents of the .csr file to your clipboard and paste it into Go Daddy's web form. This is easy on their web site. (I did not take a screen capture when I first went through the process, however the screenshot below is very similar. Just paste the contents of the CSR file that you created into this web form.
3. When asked whether to use a Go Daddy or a different provider, I chose Go Daddy.
4. Step through the process and generate the certificate.
5. Wait a few minutes, and check back in the SSL control panel. you should now have a newly generated certificate.
6. Click onto the certificate, and then choose Download from the icon bar at the top of the dialog.

6. You will be prompted for the application type. You should choose "Tomcat" since Vibe is a Tomcat application.
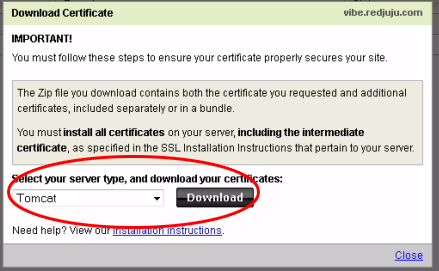
7. Download the file and save it to your PC. It is a ZIP file and is named whatever your site name is called with ."crt.zip" appended to the end of the file name.
8. Extract the contents of the file. You should have 4 files. The first three are Go Daddy specific files. The 4th one is your certificate file. You need all of them for this to work properly:
gd_bundle.crt
gd_cross_intermediate.crt
gd_intermediate.crt
.crt
9. Copy these files to the same working folder on the Linux system. Once you have done this, your temp directory should look similar to the picture below. Note that in the image, there is a file called "vibe.redjuju.com.csr". This is the file name I used when creating the csr. It could be named anything, but I like to name it the site name for clarity.

Step 4 - Import Certificates into Your New Keystore File
In the same working folder as before, where you just copied the files, you should now have the 4 files from Go Daddy, as well as the original .keystore file and .csr file. If prompted for a password in any of the steps, enter the same one you used previously.
Note: This process essentially takes all the certificate files that were provided by Go Daddy, and packs them into the single keystore file. Since Novel Vibe is configured to only load the keystore file, not the individual certs, it is critical to get through this step correctly. At the end of this process, the keystore file contains the key file (done in previous steps), your certificate file, and all required chain and root files from Go Daddy. If you receive any errors during this process, make sure to find out what happened and try again. It's easy to make a typo, and that can cause your commands to fail.
1. Install the Root certificate:
/usr/java/jdk1.6.0_20/bin/keytool -import -alias root -keystore .keystore -trustcacerts -file gd_bundle.crt
2. Install the first intermediate (gd_cross_intermediate.crt):
/usr/java/jdk1.6.0_20/bin/keytool -import -alias cross -keystore .keystore -trustcacerts -file gd_cross_intermediate.crt
3. Install the second intermediate (gd_intermediate.crt):
/usr/java/jdk1.6.0_20/bin/keytool -import -alias intermed -keystore .keystore -trustcacerts -file gd_intermediate.crt
4. Install the issued certificate:
/usr/java/jdk1.6.0_20/bin/keytool -import -alias tomcat -keystore .keystore -trustcacerts -file <name of your certificate>
Step 5 - Update Tomcat / Vibe with new Keystore File
Novell's Vibe configuration file references the keystore file, and it generally just needs to have the old keystore file replaced. It's a good idea to backup the original keystore file first.
1. Locate the Vibe configuration folder as well as the existing keystore file. It should be here:
/opt/novell/teaming/apache-tomcat/conf/.keystore
2. Make a backup of the old keystore file just in case something goes wrong, you can get it back:
cp .keystore .keystore.bak
3. Copy the newly created keystore file into the Vibe configuration folder. In my case, the syntax was as follows:
cp /data/certs/.keystore /opt/novell/teaming/apache-tomcat/conf/
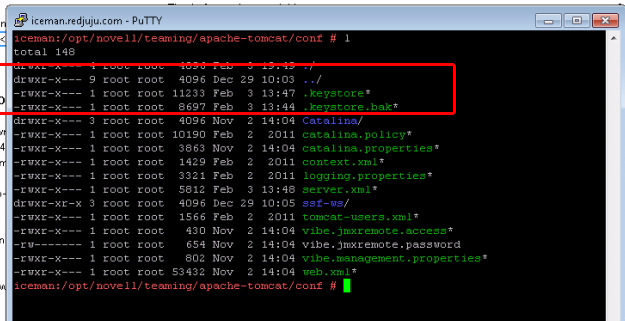
4. Confirm the .keystore file is present by doing a simple directly listing (It should show the keystore file, and make sure it looks like the date is recent):
ls -lisa
5. Confirm the .keystore file has the owner of root:root. (The Novell Tid is confusing on this point. In my case, root:root was acceptable. )
6. Change the keystore file to executable:
chmod 750 .keystore
7. Confirm the .keystore file attributes are correct, a directory listing should show as depicted below:
Step 6 - Confirm Vibe is Configured to use Keystore File
It's important to make sure that Vibe that is configured correctly with the Keystore file path and the Keystore password. Otherwise Tomcat may fail to load correctly.
1. In the Vibe configuration directory /opt/novell/teaming/apache-tomcat/conf, locate the file called "server.xml".
2. Edit the server.xml file
vi server.xml
3. Find the line that looks similar to the following:
4. In the server.xml file, note the "Keystorefile" path. Confirm that the path and file name are correct. They should point to the .keystore file that you copied in the previous steps.
5. In the server.xml file, note the "keystorePass" parameter. Confirm that the password listed is the same password that you used throughout this process.
The image below notes the two important directives in the server.xml file. Confirm they are correct:

6. Save the file after making necessary changes and exit.
Step 7 - Restart Vibe and Test Connectivity / Certificate
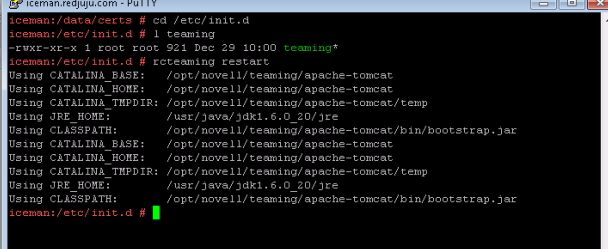
The final step is to restart Vibe. Note the command to restart it is actually "teaming" because Novell recently changed the product name from Novell Teaming to Novell Vibe.
1. Use one of the following commands to restart Vibe:
rcteaming restart
/etc/init.d/teaming restart
2. Using your web browser of choice, browse to your Vibe site and confirm that it works on a secure connection, ie HTTPS://xxx.xxx.xxx.
3. Use your browser to view the certificate and confirm that the dates are what you expect. If you just generated the certificate, it should be valid from today through at least a year, but longer if you purchased a longer certificate.
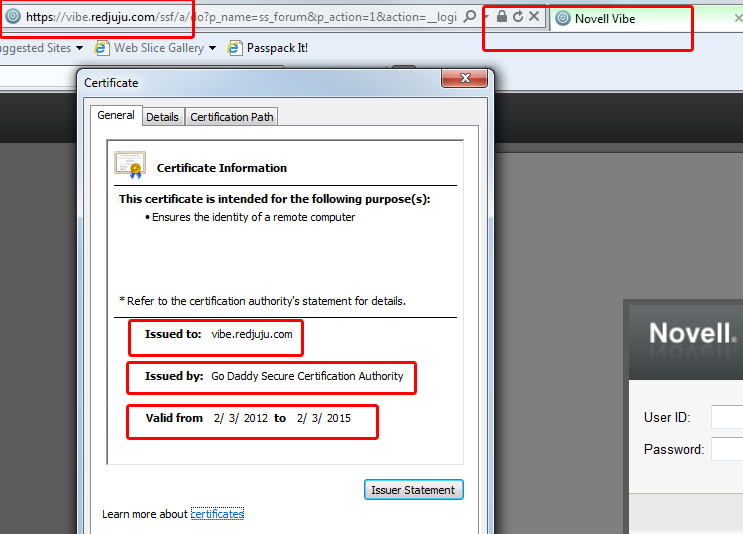
4. If you have problems accessing Vibe after restarting, you can check the log files for specific error messages. The most likely file to contain useful information is "catalina.out" located in the Vibe log folder. This and other log files can be found here:
/opt/novell/teaming/apache-tomcat/logs
*** Note, this information is provided as-is. Should you utilize this information, you do so at your own risk. This is provided free of charge for anybody to utilize, and we do not provide free support for this document or process. Should you have further questions, need clarification, or would like us to support your own environment, we offer services for a nominal fee. We also guarantee our services. ***
Your Next Novell Project
Our expertise is with Novell Vibe, GroupWise, Data Sync Mobility Pack, Open Enterprise Server, ZENworks, and VMWare. We would love to answer questions or discuss your next upgrade or migration project. Just give us a call at the number on the side or bottom of the page. When discussion project needs with you, the outline below helps us ensure that we make the most of your valuable time, while gathering the critical information needed for a successful project.
Step 1 - Technical Discussion
• Discuss your system architecture and company overview.
• Identify possible roadblocks and technical challenges.
• Determine best approach for minimal end user interruption.
Step 2 - Licensing and Project Costs
• Ensure licensing compliance and help with your purchase or renewal.
• Provide a cost estimate based on your specific project needs.
• Provide an estimated time frame for project completion from start to finish.


